
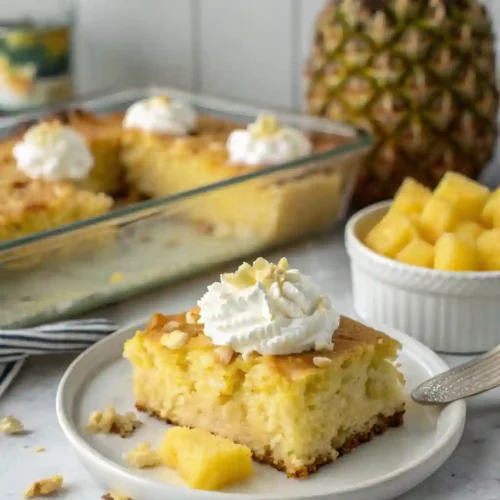
Some desserts whisper sweet nothings — this one sings. Loudly. The first time I made this pineapple condensed milk cake, it wasn’t because I was craving something tropical. It was because I had 20 minutes, a pantry full of half-used ingredients, and exactly zero patience for complicated baking. What came out of the oven? A golden, juicy, fork-tender miracle.
It’s ideal for:
- Busy home cooks who want big flavor with minimal prep.
- Anyone looking to impress at potlucks or family dinners without sweating in the kitchen.
- People who grew up with ‘poke cakes’ and want a taste of pure nostalgia — with a modern, tropically creamy twist.
What you’ll love most? No fancy tools. No obscure ingredients. No beating egg whites until your arm falls off. Just a handful of pantry staples, one pan, and a bit of fridge time to let the magic set.
So, whether you’re baking for a summer party or just need a hit of golden, gooey comfort in the middle of winter — this pineapple condensed milk cake is about to become your new favorite go-to.
Table of Contents
Ingredients for Pineapple Condensed Milk Cake
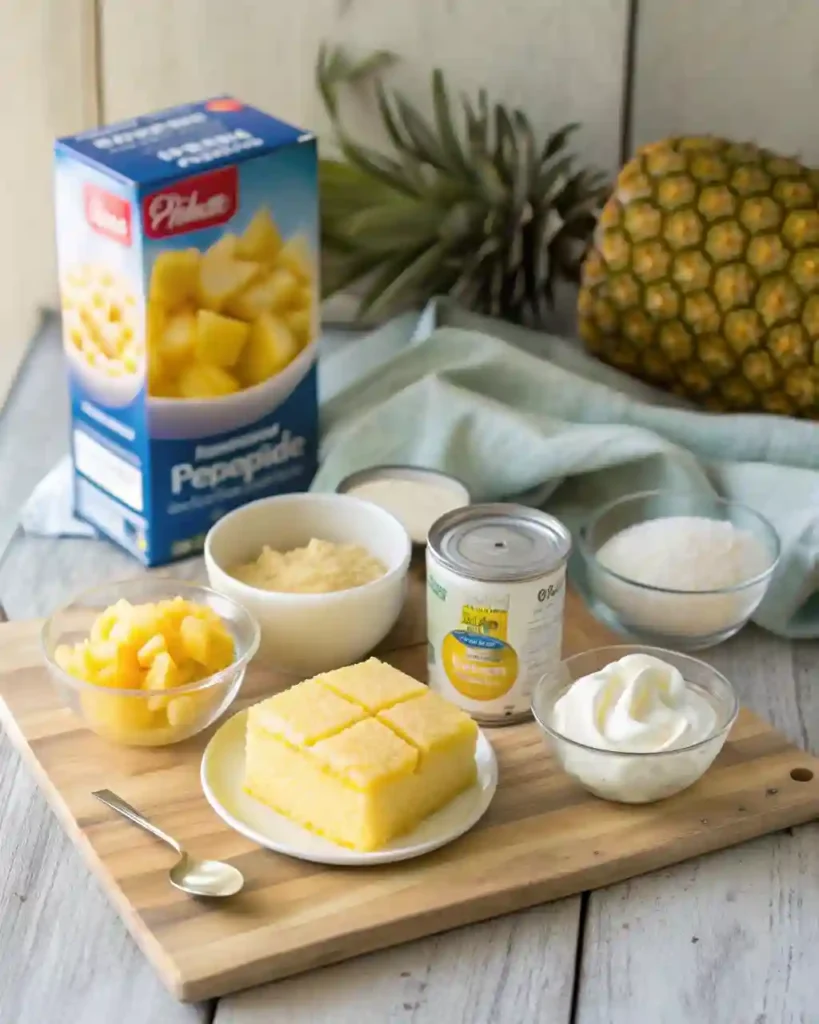
This easy dessert needs just a handful of everyday ingredients — no mixing bowls full of fluff, no chasing down specialty items. Just a few pantry staples and a tropical twist:
- 1 box yellow cake mix
The base. Any brand works — just stick to a standard size (about 15.25 oz). - 1 (20 oz) can crushed pineapple in juice (do not drain)
This moistens and flavors the batter naturally — juice included. - 1 (14 oz) can sweetened condensed milk
Adds richness and that creamy “poke cake” magic. - 1 (8 oz) container Cool Whip
For the fluffy, lightly sweet topping. You can sub with stabilized whipped cream if preferred. - 1 (8 oz) can crushed pineapple in juice (well drained)
Mixes with the Cool Whip to make that dreamy tropical frosting.
Optional Add-Ins:
- A splash of vanilla extract for warmth.
- A sprinkle of toasted coconut on top for texture and visual pop.
- Chopped maraschino cherries for color and retro flair.
How to Make Pineapple Condensed Milk Cake (Step-by-Step)
Making this cake is refreshingly simple — no stand mixer, no stress, no second-guessing. Here we go
Step-by-Step:
Frost the cooled cake with the pineapple-Cool Whip mixture. Smooth it out, then cover loosely and refrigerate for at least 1 hour before serving.
Preheat your oven to the temperature usually 350°F/175°C).
Prepare the cake batter by following the instructions , but no water water. Instead, stir in the entire 20 oz can of crushed pineapple (juice and all). The batter will feel slightly thinner than usual — that’s okay.
Grease a 9×13-inch pan (casserole or sheet) with non-stick spray or butter. Pour the batter in and smooth it out.
Bake according to the time listed for a 9×13 pan (usually 28–33 minutes), or until golden brown and springy in the center. A toothpick should come out with a few moist crumbs.
Cool the cake for 10–15 minutes. This is important. It needs to be warm — not hot — when you do the next step.
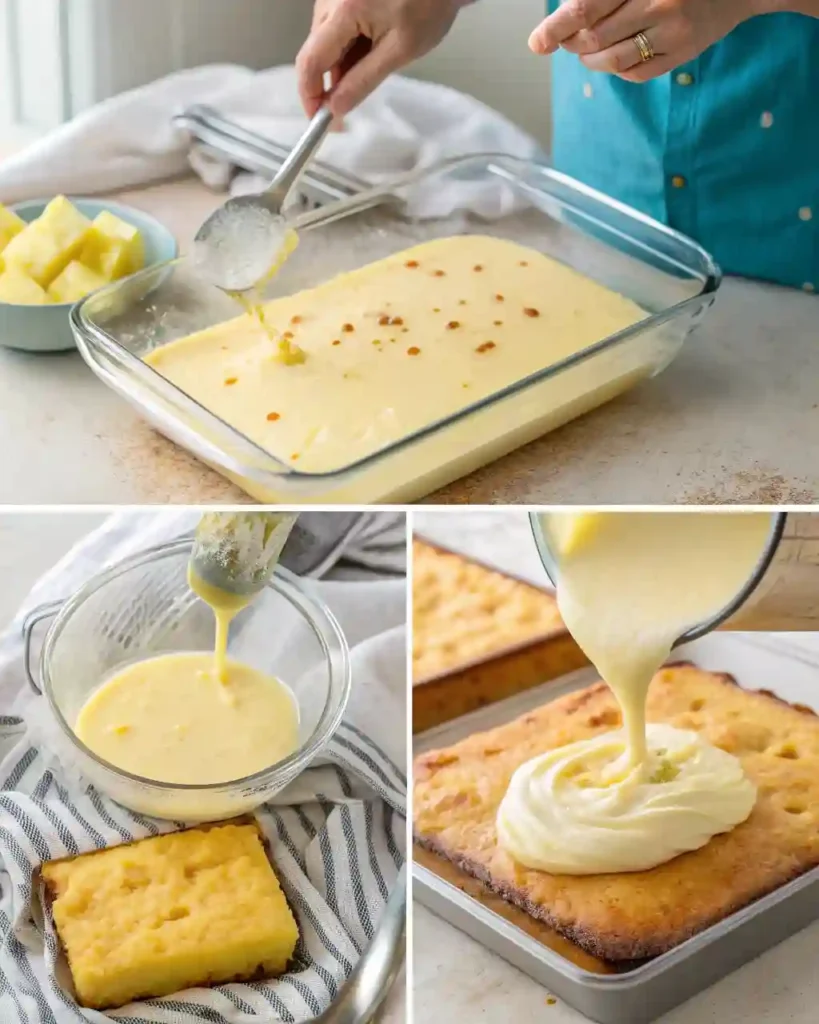
Poke holes all over the cake using a fork, skewer, or butter knife. Be generous — you’re creating tiny tunnels for the sweetened condensed milk to sink into.
Pour the condensed milk slowly over the entire surface. Tilt the pan gently if needed to help it spread. It will look like a lot — it is. That’s the point.
Let the cake rest at room temperature for 15–20 minutes to absorb the milk. Then transfer it to the fridge to cool completely.
Make the topping: In a bowl, fold together the Cool Whip and the well-drained 8 oz can of crushed pineapple until combined.
Tips & Tricks for the Perfect Pineapple Condensed Milk Cake
This cake may be simple, but a few thoughtful tweaks can take it from “yum” to “you made this?!”
Don’t Drain the Batter Pineapple — But Do Drain the Topping Pineapple
- It’s intentional: the juice in the first can of pineapple moistens the cake beautifully.
- For the topping, though, you want structure — so drain that second can thoroughly to avoid a watery whip.
Don’t Skip the Chill Time
- Tempting as it is to dive in early, this cake truly blossoms after refrigeration. Give it at least 1 hour — ideally 3+ — to let flavors settle and textures firm up.
Want More Texture? Toast Some Coconut
- Sprinkle toasted coconut flakes on top for crunch, color, and a slightly nutty counterpoint to all the creaminess. Just 5 minutes in a dry skillet brings them to life.
Use the Knife Tilt Trick for Even Condensed Milk Spread
- After pouring, gently tilt your pan side to side. This helps the condensed milk work its way into every poked crevice without pooling unevenly.
Cool Whip Pro Tip
- If your Cool Whip is too soft (from thawing), pop it in the fridge for 10–15 minutes before mixing with pineapple. You’ll get a firmer, fluffier topping.
Pineapple Condensed Milk Cake
Ingredients
1 box yellow cake mix
- The base. Any brand works — just stick to a standard size about 15.25 oz.
1 (20 oz) can crushed pineapple in juice (do not drain)
- This moistens and flavors the batter naturally — juice included.
1 (14 oz) can sweetened condensed milk
- Adds richness and that creamy “poke cake” magic.
1 (8 oz) container Cool Whip
- For the fluffy lightly sweet topping. You can sub with stabilized whipped cream if preferred.
1 (8 oz) can crushed pineapple in juice (well drained)
- Mixes with the Cool Whip to make that dreamy tropical frosting.
Instructions
Preheat your oven to the temperature listed on your yellow cake mix box (usually 350°F/175°C).
- Prepare the cake batter by following the box instructions — but skip the water. Instead, stir in the entire 20 oz can of crushed pineapple (juice and all). The batter will feel slightly thinner than usual — that’s okay.
Grease a 9×13-inch pan (casserole or sheet) with non-stick spray or butter. Pour the batter in and smooth it out.
- Bake according to the time listed for a 9×13 pan (usually 28–33 minutes), or until golden brown and springy in the center. A toothpick should come out with a few moist crumbs.
Cool the cake for 10–15 minutes. This is important. It needs to be warm — not hot — when you do the next step.
- Poke holes all over the cake using a fork, skewer, or butter knife. Be generous — you’re creating tiny tunnels for the sweetened condensed milk to sink into.
Pour the condensed milk slowly over the entire surface. Tilt the pan gently if needed to help it spread. It will look like a lot — it is. That’s the point.
- Let the cake rest at room temperature for 15–20 minutes to absorb the milk. Then transfer it to the fridge to cool completely.
Make the topping: In a bowl, fold together the Cool Whip and the well-drained 8 oz can of crushed pineapple until combined.
- Frost the cooled cake with the pineapple-Cool Whip mixture. Smooth it out, then cover loosely and refrigerate for at least 1 hour before serving.
Notes
Nutrition Information (Per Serving)
- Calories: 320
- Total Fat: 12g
- Saturated Fat: 8g
- Cholesterol: 35mg
- Sodium: 280mg
- Total Carbohydrates: 48g
- Dietary Fiber: 1g
- Sugars: 34g
- Protein: 3g
🧾 Recipe Classification
- Course: Dessert
- Cuisine: American, Tropical-Inspired
- Diet: Vegetarian
- Method: One-Pan Baking, Refrigerated Topping
- Keyword: Pineapple Condensed Milk Cake, easy pineapple cake, poke cake
- Skill Level: Beginner-Friendly
Substitutions & Variations for Pineapple Condensed Milk Cake
Want to switch things up? Whether you’re baking around allergies, dietary preferences, or just feeling adventurous, this recipe’s got room to play. Here’s how to make it your own — without compromising that craveable tropical magic.
Dairy-Free or Vegan Options
- Cool Whip got dairy? Swap it for coconut whip. Plant-based brands like So Delicious offer a coconut version that’s just as fluffy and spoon-lickable. It brings a subtle nutty depth that actually works really well with pineapple.
- Ditch the dairy condensed milk. You don’t need to miss out on that gooey richness — there are coconut-based sweetened condensed milks in most health aisles now. Or, if you’re the DIY type, you can simmer canned coconut milk with sugar until thick. It’s easier than it sounds.
- As for the cake mix — check the label. A surprising number of yellow cake mixes are already dairy-free, but don’t assume. Double-check just to be safe, especially if baking for someone with allergies.
Texture or Flavor Variations
- Add chopped walnuts or pecans to the Cool Whip layer for crunch.
- Swirl in cream cheese to the topping for a cheesecake-like twist (just mix softened cream cheese with the Cool Whip before adding pineapple).
- Layer with sliced bananas or toasted coconut for added tropical depth.
Format Flips
- Make cupcakes: Pour batter into cupcake tins (fill ¾ full), reduce bake time to 15–18 minutes. Frost individually.
- Turn it into a trifle: Cube the baked cake, layer with Cool Whip topping and extra fruit in a glass bowl for a show-stopper.
Frequently Asked Questions About Pineapple Condensed Milk Cake
Can I make this cake a day ahead?
Yes — and you should. Like a good lasagna or banana bread, this cake gets better overnight. The condensed milk fully settles into the crumb, and the topping firms up without weeping.
What if I only have pineapple chunks?
You can use them in a pinch, but chop them finely first — or pulse them in a food processor. Crushed pineapple mixes more evenly into the batter and topping, so aim for that texture.
How do I store leftovers?
Cover tightly with foil or plastic wrap and refrigerate. It keeps well for up to 4 days. You can also store slices in airtight containers.
Can I freeze this cake?
Sort of. The base freezes well (before frosting), but the Cool Whip topping can change texture after thawing. If freezing, do it before adding the topping, then frost fresh after defrosting.
Is this cake gluten-free?
Not by default. But you can easily make it so:
Use a gluten-free yellow cake mix.
Double-check that all your ingredients (especially the Cool Whip and condensed milk) are gluten-free.