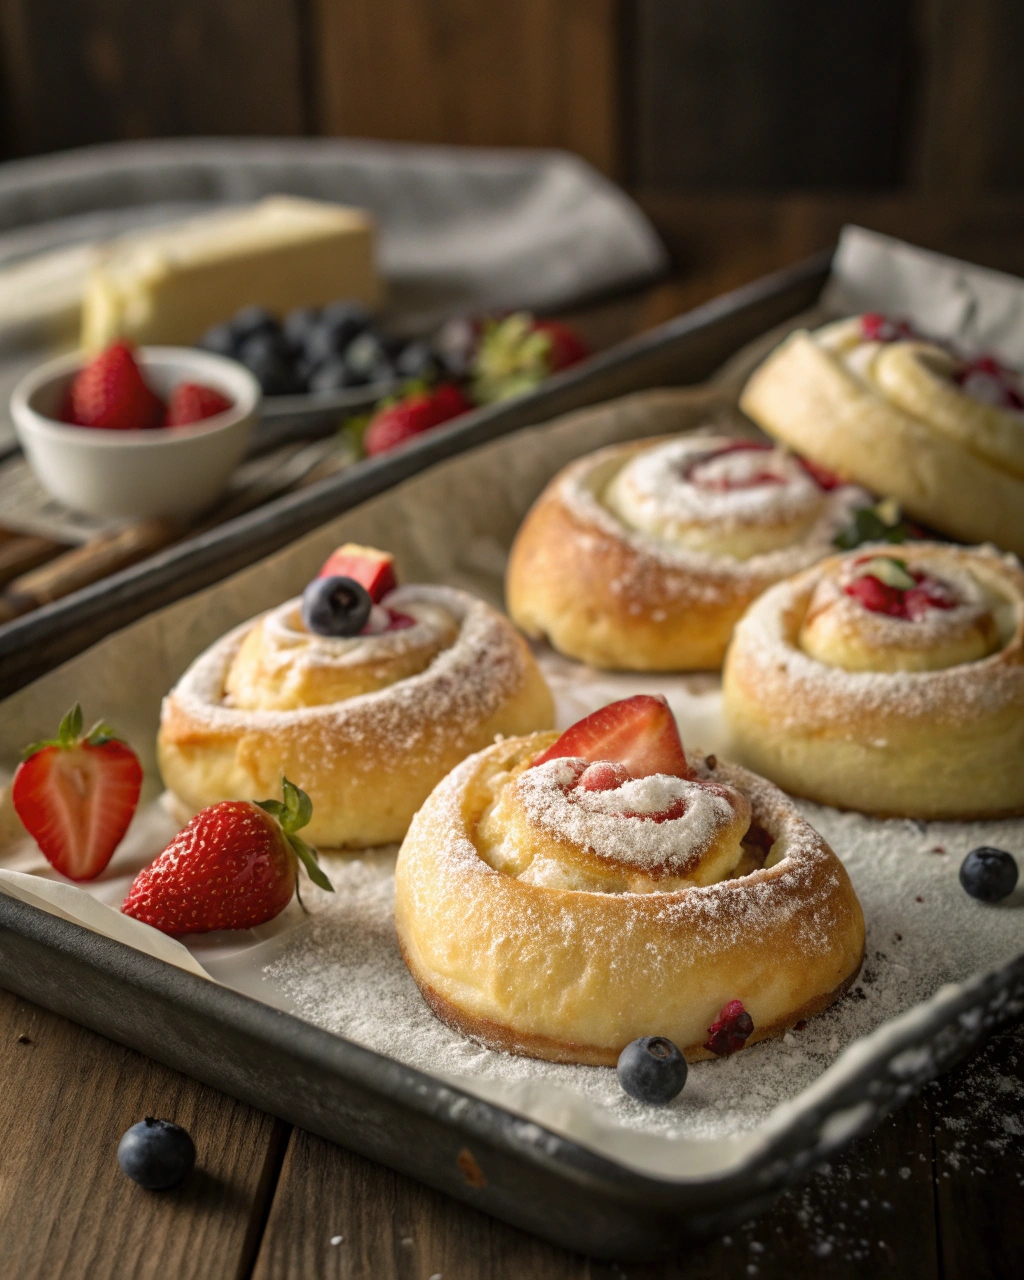
Ever have one of those days where you just need something warm and sweet to turn things around? That’s exactly where this King’s Hawaiian Cheesecake Danish comes in. It’s not health food, and it’s not trying to be. It’s soft, creamy, unapologetically rich—basically everything your weekday toast is not.
Imagine this: pillowy sweet rolls, gently pulled apart and cradling a tangy-sweet cheesecake filling. A little melted butter. A dusting of cinnamon sugar. Then into the oven they go until they’re golden, gooey, and impossible to ignore.
This isn’t just a “dessert for guests” kind of thing, it’s a “why not?” kind of thing. Great for brunch. Sneaky enough for a midnight treat. Easy enough for a Wednesday. And yeah, they reheat like a dream.
Table of Contents
Ingredients you need for Hawaiian Cheesecake
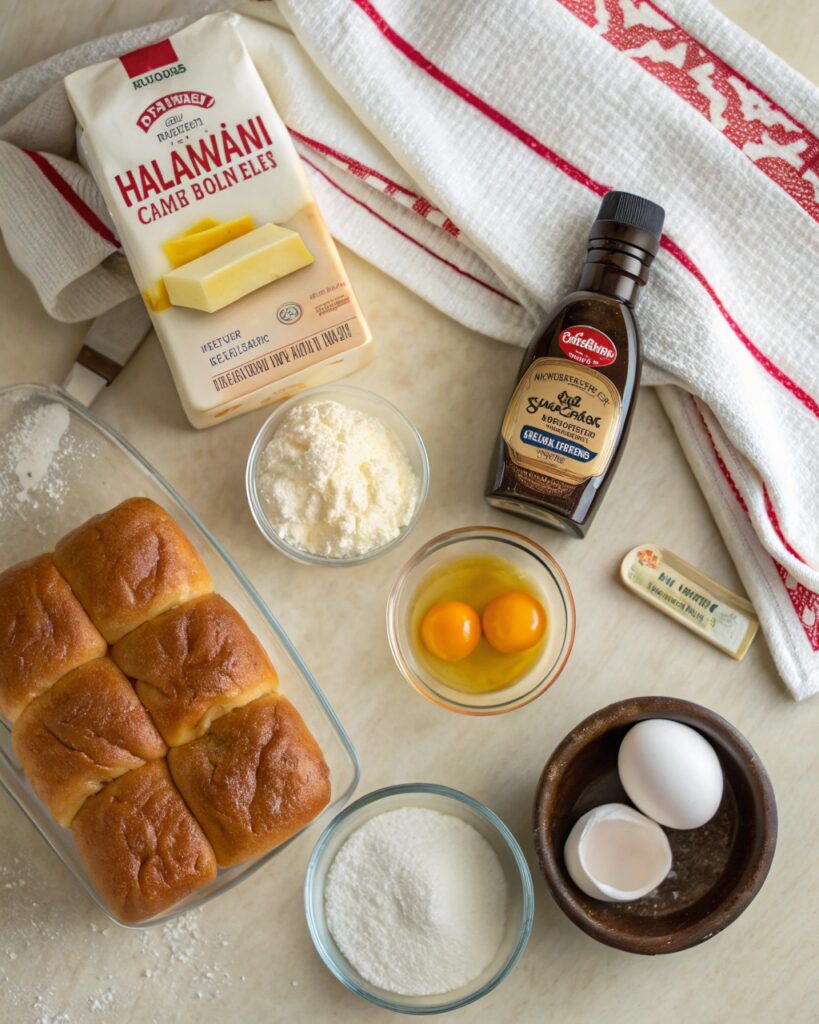
- 1 package King’s Hawaiian Sweet Rolls (12 count)
- 8 oz cream cheese, softened
- 1/4 cup granulated sugar
- 1 teaspoon vanilla extract
- 1 egg yolk
- 1/4 cup butter, melted
- 2 tablespoons cinnamon sugar (1 1/2 tablespoons sugar + 1/2 tablespoon cinnamon)
- Powdered sugar (for dusting)
Next, I’ll move into the main “How to Make” section with step-by-step instructions written for clarity and flow.
How to Make King’s Hawaiian Cheesecake Danishes
You don’t need a mixer, a fancy pan, or even much patience. This is one of those rare recipes that feels like cheating (in the best way).
Step-by-Step Instructions
- Preheat and Prep
Set your oven to 350°F (175°C). grease with parchment paper . - Create the Danish Pockets
Take each King’s Hawaiian Sweet Roll and slice it almost in half—just enough to make a pocket, not a full sandwich cut. Think “book,” not “bun.” - Whip Up the Cheesecake Filling
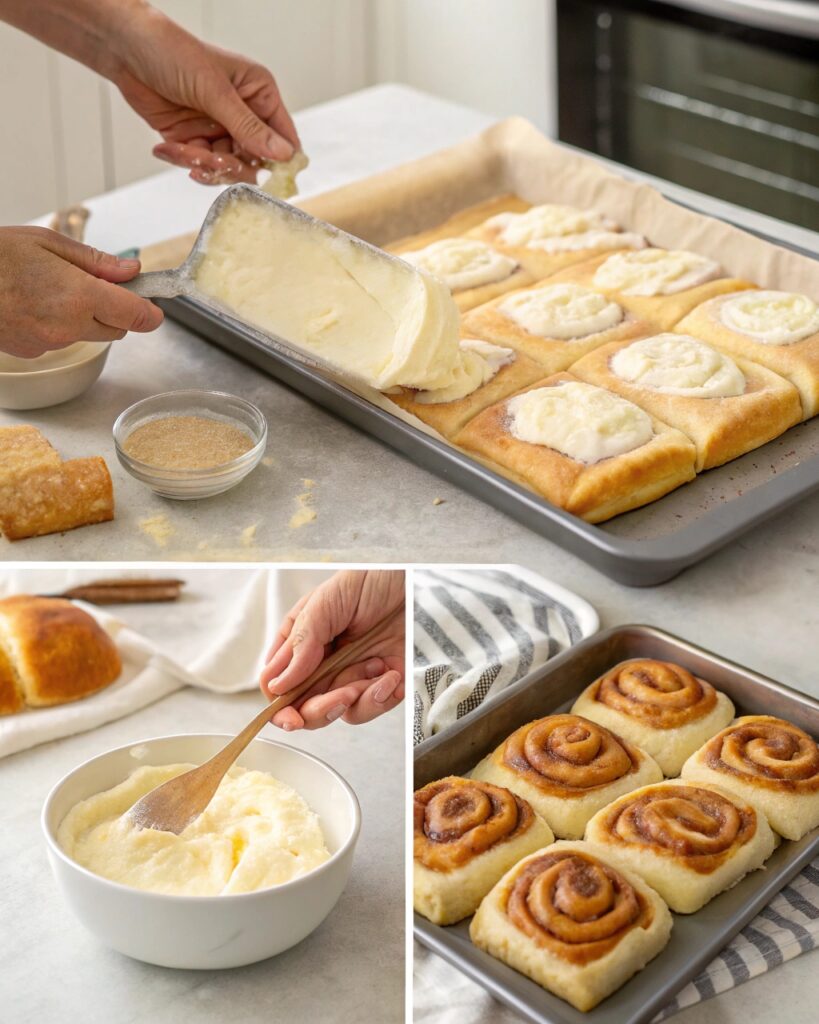
In a bowl, blend the cream cheese, granulated sugar, vanilla extract, and egg yolk until smooth. so give it a minute or two with a spoon or hand mixer. if You want it creamy, not lumpy. - Fill the Rolls
Spoon or pipe the cheesecake mixture into each roll’s pocket. You’re aiming for a good tablespoon or so—enough to feel rich, but not ooze out during baking. - Butter + Cinnamon Sugar Time
Brush the tops with melted butter, then shower them with the cinnamon sugar mix. Be generous—it’s the part that crisps and caramelizes in the oven. - Bake Until Golden
Slide the rolls onto your baking sheet and pop them into the oven. Bake for 15–20 minutes, or until they’re golden brown and the filling looks set. (It’ll puff slightly.) - Cool and Dust
Let them rest on the sheet for 5 minutes—enough to settle but still warm. Then hit them with a dusting of powdered sugar for a bakery-finish moment.
Expert Tips & Serving Suggestions
You’ve made the danishes. They smell amazing. Now what? Let’s make sure every bite hits its full potential.
Getting That Golden Bakery Finish
- Don’t rush the filling. The smoother your cream cheese mix, the silkier your Danish.
- Watch the bake time. Every oven’s got its own personality. Start checking at 15 minutes. You want golden edges, not browned bottoms.
- Let them breathe. Cooling them slightly on the tray helps avoid sogginess. It also gives the filling time to firm up just enough for that perfect bite.
Serve Them Like a Pro
- Dress them up with fruit. Add strawberries, a few sliced blueberries, or even a little of lemon curd on top before serving. It makes them feel fresh and fancy.
- Pair with coffee or cocoa. Something rich and cozy complements the sweet-tangy danish beautifully.
- Go brunch buffet style. These danishes are crowd-pleasers. Add a side of scrambled eggs or fresh melon and you’ve got an easy brunch spread that looks way more effortful than it was.
King’s Hawaiian Cheesecake Danish
Ingredients
1 package King’s Hawaiian Sweet Rolls (12 count)
- 8 oz cream cheese softened
1/4 cup granulated sugar
- 1 teaspoon vanilla extract
1 egg yolk
- 1/4 cup butter melted
2 tablespoons cinnamon sugar (1 1/2 tablespoons sugar + 1/2 tablespoon cinnamon)
- Powdered sugar for dusting
Instructions
Preheat and Prep
- Set your oven to 350°F (175°C). Line a baking sheet with parchment paper or lightly grease it—whichever’s easier.
Create the Danish Pockets
- Take each King’s Hawaiian Sweet Roll and slice it almost in half—just enough to make a pocket, not a full sandwich cut. Think “book,” not “bun.”
Whip Up the Cheesecake Filling
- In a medium bowl, blend the softened cream cheese, granulated sugar, vanilla extract, and egg yolk until smooth. You want it creamy, not lumpy, so give it a minute or two with a spoon or hand mixer.
Fill the Rolls
- Spoon or pipe the cheesecake mixture into each roll’s pocket. You’re aiming for a good tablespoon or so—enough to feel rich, but not ooze out during baking.
- Butter + Cinnamon Sugar Time
Brush the tops with melted butter, then shower them with the cinnamon sugar mix. Be generous—it’s the part that crisps and caramelizes in the oven.
Bake Until Golden
Slide the rolls onto your baking sheet and pop them into the oven. Bake for 15–20 minutes, or until they’re golden brown and the filling looks set. (It’ll puff slightly.)
Cool and Dust
- Let them rest on the sheet for 5 minutes—enough to settle but still warm. Then hit them with a dusting of powdered sugar for a bakery-finish moment.
Notes
Nutrition Information (Per Serving – Approximate):
- Calories: 300 kcal
- Total Fat: 18g
- Saturated Fat: 10g
- Cholesterol: 65mg
- Sodium: 190mg
- Carbohydrates: 30g
- Sugar: 12g
- Protein: 4g
- Fiber: 1g
🧾 Recipe Category Breakdown:
- Course: Breakfast, Brunch, Dessert
- Cuisine: American, Hawaiian-inspired
- Diet: Vegetarian
- Method: Baking
- Keywords: King’s Hawaiian Cheesecake Danish, sweet roll danish, cream cheese pastries
- Skill Level: Easy
Customizations & Variations
Once you make these once, the ideas won’t stop coming. That’s the thing about recipes like this—they’re more blueprint than rulebook. Below are a few ways to remix, personalize, or totally reinvent your King’s Hawaiian Cheesecake Danishes.
Sweet Swaps: More Than Just Cheesecake
- Berries + Cream: Drop a few fresh raspberries or blueberries right into the cheesecake pocket. As they bake, they burst slightly, creating little fruity pockets of joy.
- Citrus Zing: Stir lemon or orange zest into the filling for a brighter, brunchier vibe. (A hint of lemon curd on top? Yes, please.)
- Chocolate Drama: Mix cocoa powder into the cheesecake base or add chocolate chips. Or go full blackout—top baked danishes with ganache and sea salt.
The Unexpected Savory Twist
Let’s say it’s Sunday and you’ve already had three sweet things today. Try this: skip the sugar, mix the cream cheese with scallions, garlic powder, and a pinch of pepper, and top it all with shredded cheddar. It’s like a fancy cheese bagel, but fluffier.
Or go further—smoked salmon, capers, dill. It turns into a tiny brunch sandwich that no one saw coming.
Allergy-Friendly or Diet-Conscious Mods
- Vegan-Friendly Fix: Use a quality plant-based cream cheese (some even taste better than dairy now), a flax egg (1 tbsp flax + 3 tbsp water), and plant butter or coconut oil. Sweet, silky, still indulgent.
- Lower Sugar? Cut the sugar in the filling in half and skip the cinnamon sugar topping. Or use a sweetener like monk fruit or erythritol. It won’t taste exactly the same, but it’s still worth it.
Frequently Asked Questions
Can I use a different kind of sweet roll?
You can, technically—but expect it to feel a little… off. King’s Hawaiian rolls bring a specific soft texture and hint of sweetness that’s hard to fake. Subbing in brioche or even plain dinner rolls will work, but the result may lean more “bread pudding” than “decadent Danish.” Not a dealbreaker—just different vibes.
Can I prep these the night before?
Absolutely. Life’s chaotic—getting ahead helps. Assemble the Danishes up to the point of baking, cover tightly, and stash in the fridge overnight. The next day, bake straight from cold. You might need an extra time in the oven, just few minute ,but otherwise, it’s stress-free hosting magic.
My filling spilled everywhere. What did I mess up?
Don’t stress—it happens. Usually, it’s one of two things: you either overfilled (tempting, we know), or the slice wasn’t deep enough to cradle the filling. Try using a piping bag next time for more control, and carve out a deeper—but not all-the-way-through—pocket. It makes all the difference.
Can I use a different kind of sweet roll?
You can, but it’ll shift the whole experience. King’s Hawaiian rolls are pillowy, slightly sweet, and uniquely soft—swapping in brioche or basic dinner rolls changes the texture and flavor. Still tasty? Probably. Same magic? Not quite.